Fuser Setup
This Guide is suited to the Dichen 5th/6th Genration Fusers
1. Fuser Setup Guide
Before You Begin
Disconnect all displays except your main monitor.
Make sure the Fuser is powered off before connecting any cables.
Use only HDMI 2.1 or DisplayPort 1.4 certified cables for the best performance and signal stability.
Fuser Layout

On the back side of the Fuser, you’ll find three labelled ports:
Output (HDMI or Display Port)
Input 1 (HDMI)
Input 2 (HDMI)
Connection Order (with Fuser Off)
1️⃣ Output → Monitor • Connect DisplayPort (1.4) or HDMI (2.1) from the Fuser’s Output port to your main monitor.
2️⃣ Input 1 → Main PC • Connect HDMI (2.1) or DP (1.4) from your Main PC’s GPU to Input 1 on the Fuser.
3️⃣ Input 2 → Secondary PC (Radar PC) • Connect HDMI (2.1) or DP (1.4) from your secondary machine’s GPU to Input 2 on the Fuser.
Important Notes
The main PC’s GPU must not be connected directly to any monitor during setup. If a direct DisplayPort or HDMI cable is plugged into the monitor, unplug it before setup.
Once all connections are made, you may power on the Fuser, then both of your PCs.
Using mismatched or lower-grade cables (HDMI 2.0 / DP 1.2) can result in no signal or screen flickering.
2. Configure Display Settings
On Both PCs:
Connect PC's Directly to Monitor
Right-click on an empty area of the desktop.
Select Display Settings.
Scroll down to the Multiple displays section and select Extend these displays.
On the 2nd PC:
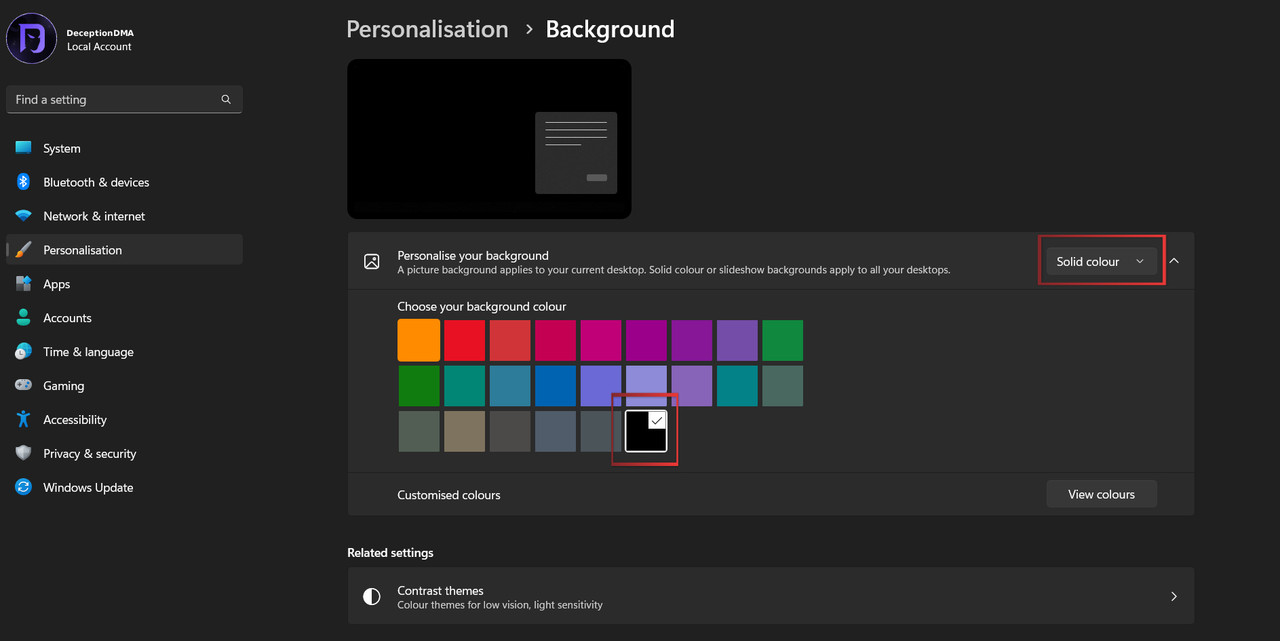
Go to Start > Settings > Personalization > Background/Wallpaper.
Under Personalize your background, select Solid Colour and choose Black.
3. Reconnect Cables to the Fuser
Ensure all three cables are connected to the Fuser as per point the connection layout above.
Make sure the monitor is no longer directly connected to the Gaming PC's GPU.
4. Fuser Button Functions
Power
Function: Turns the Fuser on or off.
K1 — Resolution Switch
Short Press: Cycles through output resolutions: • 1920×1080 • 2560×1080 • 2560×1440 • 3440×1440 • 3840×2160
Long Press (Hold 3s): Displays current resolution and refresh rate in the upper-left corner.
Top line: Gaming PC (Host) information
Bottom line: Secondary PC (Radar) information
K2 — Matting Intensity/Opacity
Short Press: Adjusts the upper-layer image matting intensity, cycling through 21 levels (0–20).
Default value: 0
Note: Level 0 still applies light matting.
K3 — Restore Default Matting
Short Press: Resets the upper-layer matting strength to the factory default (0).
K4 — Fusion Toggle
Short Press: Toggles the fusion overlay function on or off.
Note: If the fusion light is on but no perspective fusion appears, try one of the following:
Set the secondary display’s background color to pure black.
Press K2 to increase RGB intensity, improving the visibility of the overlay
Troubleshooting
Desktop Apps Are Merged / Two Search Bars Visible
Press K2 (Main Screen Mode) when no overlay is active.
Second Monitor Shows "No Signal"
Ensure the 2nd monitor is turned on.
The 2nd monitor should be connected to its respective PC, not the Fuser.
Refresh Rate Issues (Limited to 60Hz or 90Hz)
This indicates not all HDMI cables are HDMI 2.1 or Display Port 1.4.
Use Certified cables for the Fuser setup.
Last updated